


They were a featured project of the month on craftster, both for knitting AND overall. Proud? Me? Okay, a little. I promised and promised a tutorial, but I FINALLY got around to filming it this morning. I'm also going to do a write-up in case you don't want to listen to my droning and goofiness. I asked my Dad to film my hands for me, and he decided to film ME as an introduction. Me. In my sweats, a ponytail, and no makeup. A scary sight indeed, but hopefully people can get past that and gain some clarity if the write-up is confusing. So here goes!
Boogie earbuds:
Supplies:
Earbuds (duh)
Fingering weight yarn
Two size 1 dpns
1 safety pin (or stitch holder)
tapestry needle
First and foremost, MAKE SURE YOU WRAP UP EXCESS EARBUD CORDAGE (using a rubber band or something)
Trust me. You want to do this.
Using favorite cast on method (I used long tail), cast on 3(4) sts. (I say 4, because some cords are thicker than others, use your own judgement, pattern is VERY adjustable. Common sense, people.)
Okay, so cast on 3 or 4 sts. Do not turn work. Slide stitches to opposite end of needle, making sure the FIRST stitch you cast on is now your first stitch you'll be working with. (is that confusing? Let me know, or watch the video) With earbud
connector facing DOWN, make sure working yarn wraps BEHIND the earbuds. Basically, throw your earbud bundle over the yarn so the working yarn is behind the cord. Knit all stitches. Throw earbud bundle behind working yarn.
Repeat until you reach the "y" split.
Increase using your favorite method (if you cast on 3 stitches, increase 1 stitch so you have 4 stitches. If you cast on 4 stitches, increase 2 so you have 6 stitches)
Knit 2 rounds
Transfer the 2 or 3 stitches farthest from the working yarn onto safety pin.
Continue working I-cord method on right or left earbud (whichever one you're closest to) with remaining 2 or 3 stitches. When you reach the top (or the microphone thingeemabobber) cut yarn leaving a tail and run through all stitches, drawing it tight. Weave in tail. If you have a microphone thingeemabobber, just do what you did at the beginning, only cast on the smaller amount of stitches. Duh; ;) Knit I-cord to end, run yarn through stitches, blah blah blah. You get the idea.
Okay! Other ear! Go back and transfer those 2 or 3 stitches back onto your needle and knit that I-cord!
Run yarn through, draw closed, blah blah blahf You're done! Woot woot!
If this doesn't make any sense (sorry, I've never written a pattern before), you can always e-mail me at damsel@me.com, or watch the video and see if it clarifies anything. And please PLEASE don't mind the Bonnie-monster. Better with actual sleep and makeup. I hope this helps, and please let me know if you make one and send me a picture!
Maybe you'll start a trend--mandatory listening music provided for every pattern. I can't wait to try these.
ReplyDeleteThat song is STILL stuck in my head......
ReplyDeleteThat's a great idea!
This seriously ROCKS!!!
ReplyDeleteThank you! I love your announcement on your blog! So cool and creative. :)
ReplyDeleteYou rock! I am alone this weekend and I am making a set for me! Diane
ReplyDeleteI like this idea...I think I'll cast on...right now! I hate the tangling.
ReplyDeleteI would LOVE to see a pic, Diane! They only took me a few hours, and I'm not a super fast knitter. You should have them by tonight or tomorrow, and be rockin' them for the weekend. :)
ReplyDeleteWilly: Oooh, send me a pic!
ReplyDeleteVery cool idea!
ReplyDeleteMine are always getting tangled in my hair.
I am going to have to do this.
Thank you.
Right, I'm casting these on tonight! I neeeed some cool looking earbud whats-its!
ReplyDeleteThank you so much for posting this tutorial! I've already cast on, and it's looking awesome!
ReplyDeleteFinished!! http://i67.photobucket.com/albums/h315/VenusdeMichaud/headphones.jpg
ReplyDeleteYay Erica! Those look fantastic! Do you mind if I post your pic in my next blog post?
ReplyDeleteThank you for the compliment. I don't mind at all! Please do. Thanks again, Bonnie! You rock!!
ReplyDeleteVery creative. Nice way to protect the cords.
ReplyDeleteThank you! It got frustrating with the rubber getting caught in my hair as well as the cord tangles themselves. Be sure to post pics!
ReplyDeleteYou are adorable. Your idea is adorable. Much luck! You deserve an award.
ReplyDeleteYou may be anonymous, but I like you already. ;)
ReplyDeleteWhat a great idea! Pattern was awesome enough, but the video is even better thanks s much! You def have a new follower!
ReplyDeleteThank you Dee! That totally made my day. :) *hugs*
ReplyDeleteSo I finished my right earbud, starting left, only problem I'm having is now I want to buy mor earbuds so I can knit all dif colors! You've created a boogie earbudaholic!!
ReplyDeleteI know exactly what you mean, Dee! I just finished another pair for myself yesterday (same yarn, new earbuds). :) I showed them to my knitting group yesterday, and one of the ladies who is an instructor there said "if you can stand all that i-cord, more power to ya!" LOL! Yeah, it's a bit tedious at times, but it seems to work up pretty quickly. And hey, no more tangles, right? ;)
ReplyDeleteI think I love you for these instructions! Gotta go buy some yarn tomorrow =) /Malena, Stockholm, Sweden
ReplyDeleteThank you Malena! The wonderful thing about these is that it just takes scraps. You'll still have tons left over for a pair of socks. :) Thank you for stopping by, and check back soon - I'll be posting a sock pattern!
ReplyDeleteThese are awesome. I'm casting on NOW. Also listening to the mandatory music. :)
ReplyDeleteThanks for visiting Heather! Will you post pictures when you're done? I'd love to see your earbuds when they're finished. :) What yarn/colorway are you using? Inquiring minds want to know!
ReplyDeleteI LOVE the icover idea! I just wish I were adept at knitting. Unfortunately, I only know the basics and this might be beyond my skill level. You don't crochet, too, by any chance, do you? I'm a much better crocheter and would love a crochet pattern for the icover!
ReplyDeleteHi Annie! Alas, I didn't take to crochet as much as knitting, but my sister is a great crocheter! I keep harassing her about writing up a crochet version of this tutorial, and I'm going to continue until she caves in and writes it up. Keep your eyes here, hopefully she'll get on it in the next few weeks!
ReplyDeletean excellent tutorial, with plenty of personality. Thank you.
ReplyDeleteQuestion: what yarn did you use, exactly? I ask because I have seen other versions of this, but none so good looking and smooth.
Thanks for sharing.
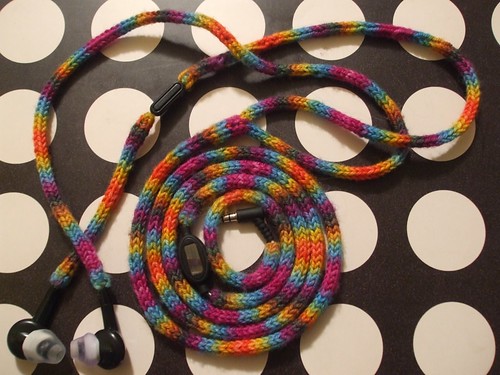
Hi! The yarn that I used is Socks that Rock from Blue Mountain Fiber Arts. The colorway is Fire on the Mountain, and if you want this specific yarn, you can find it here: http://www.bluemoonfiberarts.com/newmoon/index.php?main_page=index&cPath=19_20_30
ReplyDeleteThis yarn is so wonderful to work with, and i really love the fast changing colors. Good luck, and don't forget to post pictures when you're done!
Whoops, I meant Blue Moon, not Blue Mountain. Heh.
ReplyDeleteThese are too cute! I can't wait to make them. Thanks for the pattern.
ReplyDeleteYou're so very welcome, Elizabeth! Thank you for visiting!
ReplyDeleteHi Bonnie,
ReplyDeleteDid you give permission for your tutorial to be posted over here on this blog: In the Garden
http://inthe-garden.blogspot.com/2011/05/tutorial-for-i-cord-earphone-cover.html
Just asking because a fellow blogger had her tutorial stolen, and passed off as the authors (without permission)... I was browsing through...to see if there were any others, and I found yours. She keeps your info at the bottom though, and deleted the other bloggers, so maybe she had permission from you? I hope so!
Sorry Bonnie! I just read the comments...I see you already know about this...sorry to bring it up again. It must be very upsetting :(
ReplyDeleteHi Debbie! Thank you for the heads-up, it made me smile to know that somebody else also cared enough to contact the other crafters about their tutorials. I spent my work breaks yesterday tracking everyone down and sending them e-mails or commenting on their blogs, and that gave me immense satisfaction. I feel a lot more at peace today seeing the army that has risen up in defense, and knowing that blogger will delete their account as soon as it works its way through the system. Ah, sweet justice. :D No use in staying angry though, I'm more indignant now than anything.
ReplyDeleteBonnie, I A-D-O-R-E this idea!
ReplyDeleteI'd like to ask you (for the next post) to increase the sound and zoom a little bit...
Wish you good luck.
oxo from Brazil,
Vera
Another great idea! I can make them to match my yoga socks from your pattern.
ReplyDeleteFab-u-lous! Now I just need a magic spell to make my husband and kids disappear so I can have a go - do you have a tute for that too? :D
ReplyDeleteHI, thanks for the great pattern. I made these for my new headphones, check them out here!
ReplyDeleteYay! making these has finally perfected my iCord technique! thank you so much for the inspiration <3
ReplyDeleteCute idea! Made me want to cast on right away, Though I had to laugh, I-cord for an I-pod. Anyway, loved it.
ReplyDeleteThanks for posting! Just finishing up. Very simple but I needed your instructions to figure it out. Much appreciated.
ReplyDeleteYou're so welcome! I'm very glad it helped. Be sure and send me a pic! I'd love to see them all finished. :)
ReplyDeleteAwesome Bonnie! Just bought some Tosh Merino Light in Neon Yellow and green. My high school age daughter will love these. Am making pairs for all my kids for valentines day. Love the creativity.
ReplyDeleteDude!? You're a genius!! I'm 1/2 way through!
ReplyDeleteThank you!
ReplyDeletehere is my project page with pictures. It's an eyecatcher :-)
I called it rainbow snake
They look fantastic!! Great job!
ReplyDeleteTOO COOL!!! One quick question though - can i just knit over the microphone in my earbuds or not???
ReplyDeleteI wouldn't really recommend it, seems like it would muffle the sound. But hey, you can always try and see how it turns out! :D
DeleteFantastic idea! Will be knitting some of these up for sure!
ReplyDeleteI LOVE these!! : DDD
ReplyDeleteGreat idea!
Hey there! These look so neat and I really want to try them out but I have a question. What do you do if you want to switch colours? I wanted to make the right ear cord and the left ear cord different colours but I'm not quite sure what to do. A little help please? :)
ReplyDeleteI love the idea! I'm working on a test-set right now. I think my yarn might be a bit too thick, but I need to practice my i-cord anyways since I'm not so great with the tension. thanks for posting the tutorial, don't think I would have figured it out on my own. Thanks again!
ReplyDeleteWow, that's such a great idea! Can't wait to try it out! :)
ReplyDeleteI have the ifrogz earbuds, they are noise cancelling but i find that i can "hear" it when they get bumped or brushed against my clothes. I'm sure that sounds loopy but I am hoping if I use your pattern it will provide a buffer of sorts to keep that from happening.
ReplyDeleteThanks so much for the pattern and the tunes!!
I love this idea but I can't get it started for some reason :( HELP!!!!
ReplyDeleteThis rocks! So very cool! thank you!
ReplyDeleteThis is awesome! A super quick knit! I'm almost done with the earbuds I use for the gym, then I'm going to work on the ones I keep in my purse. YAY! Thank you!
ReplyDeleteThis is so awesome! thanks so much!
ReplyDeleteDid you ever get your sister to do a tutorial for these? Just curious, I am clueless to knitting but crochet, that is right up my alley. Thanks!
ReplyDeleteI have cats who eat my earbuds if I fall asleep while wearing them. I am casting these on NOW. And then I'll do my husband's....
ReplyDeleteI would start these tomorrow if I hadn't just busted my earbuds... As soon as I get new ones, I'll be on it!
ReplyDeleteHey, this looks like a really great way to use up that special sock yarn that I couldn't bear to throw away. Thanks!
ReplyDeleteAm I the first in 2013 to make this pattern? I did, and I LOVE it!! Thank you so much!
ReplyDeleteJust made this pattern and love it! Than you so much!!!
ReplyDeleteWhat a great idea!!! Thanks for posting and making the video! I've been looking for something quick/small to knit while on a 4 hour car ride this weekend. Can't wait to make it!!
ReplyDeleteI just cast on and have knit about 10". It is extremely easy following your directions. Thanks for the video. This is such a great project!
ReplyDeleteHmm I'm thinking of changing the pattern a little bit to decorate my phone or laptop charger!
ReplyDeleteThank you for the excellent project. I had been contemplating making a cozy and found this on Ravelry! Happy knitting.
ReplyDeleteFantastic!! I have a bunch of small amounts of yarn left over from my sock knitting. It's winter here and very, very cold so when hubby or I go on walks, it's going to be safer for the cord of our headphones!
ReplyDeleteYaY! This pattern is going to help me personalize everyone's headphones in my house. I am excited to get started. Thanks, Heather
ReplyDeleteWould this be possible with circular needles? I don't have any DPN's small enough
ReplyDeleteThis is such a great idea, thanks so much for sharing!
ReplyDelete