made by Leeloumade by Leeloumade by Leeloumade by Leeloumade by Leelou

Saturday, June 25, 2011

The fastest, easiest pillowcase ever

Today turned out to be an incredibly productive day. I finished all 7 of the bridesmaids pouches for my friend Bonz (her name is also Bonnie, she owns huskies, and she's an insatiable crafter. We are soul sisters. Her nickname is Bonz, mine is Boo!), and before continuing onto the groomsmens' bags (which will be fast and easy), I decided to reward myself by indulging in a trend I've been seeing. Pillowcases!

Have you seen the pillowcases popping up lately all over craft blogs? They're so cute! I've always had very simple, basic sheets. Usually I'll decorate more with accessories (blankets, pillow, etc.), and keep things simple for the bed. But when I saw all these adorable pillowcases, I caved. They look so bright and happy, and I have been BADLY in need of some extra happy lately. I won't lie, I've been pretty depressed. It's amazing my crafting inspiration has been as active as it has. It comes and goes, some days are better than others. If it wasn't for my huskies and crafting, it would be a bleak life indeed. When I say it totally makes my day to wake up and read all your comments and crafty love? I really mean it. Some days it's about all that sustains me. OMG! Angst? Feelings? On a crafting blog?! I'm a writer too, so yes. Things other than crafting will appear here. Lately I've been having such a blast communicating over twitter, blogs, and facebook with Jenna of Sewhappygeek, and Shanna of Fiberofallsorts, that I've been super duper inspired, and sewing has pretty much taken over my life. I even joined up with my very first ever quilting bee! It's being organized by Shanna, and I'm so excited. I'm not a quilter, but I'm confident enough in my sewing skills to feel comfortable creating one quilt block a month. I balked a little, because I have a history of letting people down, and because the bee takes place over the course of a year. A year?! Who knows what life will be in a year?! But when I sat and thought about it, one quilt block a month is totally do-able. No matter what turmoil life throws at me, I should be able to complete a single solitary quilt block a month. I'll write more about that in the future. And Jenna, I met her during the whole "Bastard-stole-my-tutorial" fiasco, and she has quickly become a good friend. She wasn't the bastard, she was another victim I contacted about her tutorial being stolen also.  Love you guys! So, to fill the void, sew! Knit! Blog! It's all healthy and productive, right? Just smile and nod. 

My attention span for following people's tutorials hasn't been so great lately, so I've been figuring them out for myself. The bonus of that is I can create new tutorials for you guys! Yay! I know there's lots of pillowcase tutorials out there, but I figured one more wouldn't hurt. Plus, this one's pretty cool. Why? Because they take 20 minutes each, there's no exposed edges, and you get to use ribbon. Awesomesauce! So grab your fabric, ribbon, and follow along!

I measured a pillowcase I already had, I think it's just a "standard size". 
Each pillowcase will take one yard of main fabric (with some leftovers), and a half yard of a contrasting fabric. For the ribbon, I dove back into the stash of vintage ribbon from garage sales. :)

Here we go!
Cut one piece of the main fabric 20"x52"(I didn't want a seam at the end, but if you don't mind feel free to cut two pieces at 20"x 25.5") 
Cut two pieces contrasting fabric 20"x10"


Fold the edge pieces in half so that they measure 20"x5", iron and give it a steam

Place the folded piece on the WRONG SIDE of the fabric so that they 20" edge match up, and sew a 1/2" seam. It's easiest if you have a nice generous seam allowance. Do this for both edges.

It should look like this. You haven't opened the seams yet, so the edges are lying on the wrong side. Make sense?
Iron and steam your seams open. WHAT?! SEAMS SHOWING ON THE RIGHT SIDE?! That's so....WRONG! Nope, you're doing it perfectly. Stick with me here.
Now take your ribbon and line it up, pinning it over the seams. Sneaky, eh?

Woo! All done there!

The underneath looks like this. Look Ma! No exposed seams! Heh heh heh...
Almost done. Promise. Now you're going to fold your pillowcase, bringing the contrasting edges together. 
Sew up the sides with a 1/4" seam (or if you want to do a 1/8" seam that's okay too. You just want a leeeeetle seam) with the RIGHT SIDE FACING OUT! This seems very counterintuitive, but trust me. 

 
Okay. So now it looks like you've sewed up the sides to expose the raw edge. Turn your pillowcase inside out and iron the seams flat. It should look like this.
Here's the part where your trust in me pays off! Sew about 1/2" seam all the way down the sides, like this.   Just make sure that the raw edges are captured inside the new seam. 

VOILA! The raw edges are inside the other seam, leaving you with a "hey, I almost did a french seam but not really" thing. From what I understand, it would be a french seam if you sewed the seam flat, right? I have no idea. I've never done a french seam. I thought I was being a clever Boo.

See? It's like a seam inside of a seam. That way, when you wash it, you won't have any fraying or any pinked edges showing! Yay for neat seams!

Now turn inside out, stuff your pillow inside, and whee! Fun pillow cases!
Man, I love that vintage ribbon. What am I going to do when it runs out? *sob*

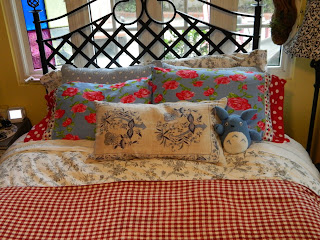
Happy bed. Good thing a male doesn't live here, he'd be so embarrassed. And Totoro says hi.  Hi Totoro!
I sewed up the second pillowcase as a test to see just how long it would take without "technical difficulties" (and because I have symmetry issues when it comes to decor), or taking photographs, and it was about 20 minutes. Seriously. This is a quick, easy project, and I would *LOVE* to see anything you guys make! Send me pictures, please!


Friday, June 24, 2011

Thought I forgot, didncha?

It's Friday! I know everybody always says that every friday, right? Here's my Friday so far:
English breakfast tea
and company in bed


Upon checking facebook this morning, I saw a post by my friend Karen, with a photo of a Pandora station based on Sergio Mendes. It's a softer brazilian music, perfect for chilling out and relaxing. So relaxing, that it puts one of her huskies, Dave, right to sleep. Her huskies have their own blog too. I had been trying to create a brazilian station on Pandora, but couldn't seem to hit the right spot. This does it. :) I'm so playing this station for my massage clients today. Something about Portuguese with that samba beat that makes me smile. I'm listening right now.

So it's Friday! I was up a little early today so I could write before I head off to breakfast with my friend Tom, who just moved back into town recently. I've known him since I was oh....12? Nothing is better than old friends. After that, hopefully I'll have time to crank out another pouch before work, where I've got a full schedule, then heading to my friend Kathy's house for tacos, margaritas and game night. Just us girls, Kathy, Shilo (of the evil comedian story) and me. Mad fun to be had by all. I've been loving all this friend time lately!

What's that? It's the 24th? I said I'd run the garage sailor pouch contest until the 22nd? You're right, you're right. I could say that I've been crazy busy, which is true, and literally did not have any time at all to write yesterday (also true), but I also wanted to let any stragglers leave a comment and enter if they wanted to. We'll go with that. THE WINNER IS..................*boom chica boom chica boom* (that's a brazilian drumroll)

Is it Cathy or Catie? LOL! who said:

Cathy said...


OH MY I really really want that LOL
Thanks so for the tute and the great opportunituy
Cheers
Catie


Congrats! I can't find your e-mail however, so please contact me! 

Thank you to everybody who left me lovely comments, I can't tell you what warm fuzzies that gives me. I'll be running another contest soon, and keep your eyes peeled for more awesome tutorials (hint: I have an amazing guest-blogger in about two weeks)

I must get ready and go, breakfast awaits! The question is....will I be a good girl and have a protein-y omelet? Or will the siren call of waffles or pancakes (oooh.....or even crepes!) win? Sounding like lingonberry crepes are gonna win. Then tacos and margaritas tonight? How much friday goodness can one girl take?! We'll find out. ;)

Happy Friday everybody!


Wednesday, June 22, 2011

A morning of gratitude

Despite the fact that I woke up at about 2:30am last night from restless huskies deciding they did or didn't want to be on the bed (and it was HOT last night!) and couldn't get back to sleep, I'm in a pretty fine mood this morning. I turned the brightness down on my iPad and read some more of my book until I managed to drift back off to sleep. If you're curious, I'm reading Black Magic Sanction by Kim Harrison. I read to escape, and her writing is a great mixture of "not TOO fantasy that it's off-putting", good writing (I'm a HARD critic, I tell ya), and just plain fun. Go read some Kim Harrison. You won't be disappointed if you're looking for a fun escapist read. I'm also reading Pirate Latitudes by Michael Crichton, but I've been leaning more toward the former lately because it's juicier and more "accessible". Not that Pirate Latitudes is a drudge to read, it's a great swashbuckler that's tons of fun, just a little more involved.

Wow, that was a tangent. Sorry, guys. Anywho, I guess both huskies decided they wanted up on the bed with me, abandoning their custom bed I slaved over a week or so ago. Waking up with two huskies snuggled up with me always gives me the warm fuzzies in my heart. Not a bad way to wake up. So! For a mid week pick-me-up, here's a few things I'm deeply grateful for today:


  • Waking up to snuggly huskies who wag their tails when I open my eyes and say "good morning!"
  • A nice hot cup of good ol' English Breakfast tea with half 'n half to go with my cheesy scrambled eggs and bacon.
  • Bacon. 'Nuff said.
  • Thinking somebody turned the radio on to a lovely classical music station and discovering it's my sister practicing a Chopin piece on our baby grand piano. I left my door open so I could listen. I LOVE that my sis and I have been musicians our whole lives. It gave us an identity and a safe haven, and something to be proud of. We both play piano and cello. My sister was always the better pianist (she can sightread anything you put in front of her), but I was always the better cellist. She won't argue. We both played in drumline through high school too. Please schools, PLEASE don't cut the music programs. It saved us.
  • My neck wasn't quite as sore as usual this morning. I won't lie, it's been pretty bad lately. So those times it doesn't seem as bad, and I actually DON'T have a headache are to be savored. 
  • And finally, when I called the Sew & Vac place to see how my machine was coming (I really was just wanting an update, I wasn't nagging or pushing), they said "it's on the bench as we speak. It should be done in an hour or two". 


Let me reiterate that last one. It should be done in an hour or two. This makes me incredibly happy for multiple reasons. I love my machine (a Viking Victoria), I can really start cranking out those pouches again:

and the greatest reason of all: He didn't find anything super-duper wrong with it! This makes me want to do the crazy-person laugh. I completely dismantled my machine, put it back together again (including computerized components), and all he needed to do was give it a clean and tune. I don't know whether to be proud of myself, or feel like I was FRIGGIN LUCKY and dodged a bullet. Gift horse? Mouth? I ain't lookin'.

And finally!

  • You guys. I'm being serious. Waking up and reading your comments makes me feel like a million bucks. It's one thing when your friends and family say "oh, that's great! Cute!" or "I love your writing!" But it's another completely when someone you've never met tells you. Thank you. 

On that note, I want to share some of the beautiful projects people have made with my free tutorials! (The names are Ravelry usernames. Thank you for your permission to use your photos, guys!)
Boogie earbuds by Papersavvy 
Boogie earbuds by Ronni-licious 
Boogie Earbuds by FiberHound


TWO sets of Boogie Earbuds by WimpWoman!
All Twisted Up Yoga Socks by GoldenHamster. Beautiful! If you're on Ravelry, you can click on her photo to see her Ravelry Designer page. Wish I could crochet!
All Twisted Up Yoga Socks by MadMomma
There were so many beautiful examples, I wish I could include them all here. Thank you, you guys for sharing your finished projects and allowing me to post them here!

Okay, one last feel-good thing of the day. The other morning, I woke up and had an e-mail all the way from India, regarding my Nikon L120 review

Hi,

I am Febin Kurian from Chennai - India. Recently I was in search for a good digital camera. While searching on internet I could see your blog on Nikon L120 and that made me to zero in to buy one Nikon L 120. I sending this email to thank you for helping me to buy a very good camera. Thanks once again.

I am attaching couple of snaps that I have taken using Nikon L120


Regards 

Febin

And these were the photos Febin attached.


Wow! Especially the one of the Tiger Lilly (Is that what it is? Help me out people!). Beautiful photography. When I wrote back to Febin, they said they would be honored if I would share their photography, and gave me a link to see more of it. I must explore that sometime. :) Then they made me promise to share my photography as well, so I may have a new photo-penpal! How exciting!

All of this makes me feel so dang good. I feel like I have friends all over the world. Blogging has opened up all kinds of possibilities, and I've made all kinds of wonderful new friends. Okay, now I'm just gushing. Anyway, I hope you all have a wonderful Wednesday, and I've gotta hurry and get ready for work! *ZOOOOM*

Monday, June 20, 2011

Do not try this at home. Ever. For any reason.

*Don't forget! You have two more days to leave a comment HERE to win the garage sailor pouch!*

First of all, a huge ginormous WELCOME to the new readers! I love you guys. You're my reason for blogging. How was your weekend everybody? We've been having  the typical June Gloom here in sunny Southern California, which is actually pretty welcome. There's even been a tiny bit of rain! Makes me want to snuggle in and spend a whole day knitting. But nope, no time for that for me. Here's how my weekend went:

Saturday, also known as "The Day That Ended in Horror"
Back around mid/late May, I was shooting emails back and forth with a fellow husky owner, musher, and crafter extraordinaire friend, Bonz. She was showing me some beautiful fabric she had designed to make "survival kits" as bridesmaid/groomsmen gifts. I LOVED this fabric. I had to have it. You can click on the pictures below, they're linked to where you can buy it. Cute, no?

survival olive green survival

So we worked out a deal where I would make the pouches, and get to keep whatever fabric was left over.  Whoring myself out for fabric? Yep. Will work for fabric. I be poor. I be so poor, I'm po'. Can't even afford the 'or. All in all, there were going to be 17 pouches with the extras Bonz wanted for herself and her family. She needs them by the beginning of July. Eek! Okay, but can do. I figured if I could churn out 2-3 pouches a day (with my schedule, that's doing pretty good) I could get it done in a timely manner.  My panic increased a bit when the fabric didn't arrive until this past wednesday.  I can do it! I can do it! I just can't procrastinate, and must buckle down. I consider it a great test for myself to see if I really CAN make sewing a bit more of a business instead of a "if I feel like it" sort of thing. Strength and personal character, right? Right. :)
     Thursday and friday evenings I cut out the pieces I would need. Saturday morning was the last of the cutting-out, and I felt pretty darn good. Go Boo, go! You can do it! As I sewed together the decorative bits for the bridesmaids pouches, I marveled at how productive I was. Damn! I could really move if I wanted to! I was so damn proud of myself. Theoretically, I could finish all 7 of the girls' pouches in ONE DAY. I had my Django Reinhardt station on Pandora, sleepy huskies behaving, and some smelly-good oil burning. It was a fantastic day. I was ready to sew in the zippers, when my machine got a bit noisy and "catchy" (you know, it doesn't want to flow and catches along the way?). Nooo! Not my Viking Victoria!
     I opened up the bobbin case, took it apart, blew out the lint (it needs a good cleaning) and inspected everything to see if there were any tangles or anything out of place. Nope, not really. Top thread? Nope, everything looked correct. So I adjusted my tension and tried again. Same problem. Bottom part looked loopy in places and easily came apart. This is a sample on a piece of test fabric, dark so I could see the white threads easily:


WTF?!?! I continued to fiddle, and started to get really upset.

So what does Bonnie do when she gets really upset? I'll show you:
Folks, DO NOT TRY THIS AT HOME!!
Oh yes, yes I did. I was desperate. I was the kid that always took things apart and put them back together. Not that I'm a mechanical genius, but generally I can figure it out. I was just looking for something jammed, or some lint backed up somewhere, a tangle, ANYTHING. Which I did find, by the way. There was some old thread wrapped around a place I couldn't have gotten to without taking everything apart.
    My hands were shaking the whole time, and I was muttering expletives, trying to be VERY GENTLE and not break anything. Which I didn't. Go me. This was about.....oh...5? 6pm? And by 11pm I had this:
I said who's hoooouuse? BOO'S HOOOUSE!! 
I managed to get all the computerized parts attached correctly, everything hooked up, and running. The stitching seems fine now. *WHEW* I cannot portray my relief. You know that crazy laugh people do after a giant disaster they've lived through? The one that says "holy shit, I can't believe we just got through that!". Yeah.

I have an appointment to bring my machine into my local sew & vac place for a proper cleaning and tuning, because the machine is running LOUD now. This is not supposed to be a loud machine. I'm sure it needs a good oiling, and hopefully they can check it out and see if everything is in its proper place. Please lord, please let it be a simple fix. But at least it's functioning, and I didn't completely kill it. I am all at once proud of myself, and also want to beat myself over the head. *whack whack* YOU ARE NOT A MACHINE TECHNICIAN THAT WAS A COMPLETELY STUPID THING TO DO! *Whack whack whack*

So I'll be borrowing a machine from a wonderful friend until my machine comes home, hopefully in 3-5 days if the nice lady on the phone was correct. But who knows? They could open it up and say "what in the world did somebody DO to this poor machine?!" and they could quote me some astronomical price and timeline to fix it. Please people, I need all the good things you can spare. 

Sunday was spent in a haze of knitting, netflix, and napping. First The Rocketter (I <3 that movie), then disc one of Mad Men, season one. Yes, I know. I'm the last one to jump on the bandwagon of Mad Men. I loved it! Can't wait until the next discs come! Pizza was ordered and consumed, and a stupidly long nap was had. My wonderful sister brought me home a carnitas burrito from Chronic Taco, and I figured a glass of wine was well deserved with dinner. 

So how was your weekend? LOL!


Thursday, June 16, 2011

Hi there, garage-sailor

Well, garage SALE-er, actually. But I kinda like that. As you know, I do love garage sale-ing. I love having a little pouch to hold all my quarters (an essential for garage-saleing!), dollar bills, etc. It sure beats lugging a purse around with you as you jump in and out of your car about a million times over the course of the morning.

Because I love you guys, I'm going to share a dirty little secret. There's a certain bargaining technique I may or may not have used over the years. I will not incriminate myself. Sometimes, when a person is reluctant to accept a lower price for something, you can fish around in your pouch and go "oh, shoot! You really won't take fifty cents for that? It's all I've got left today..." when you really do have a few more bills stashed in your pocket. But they don't know that. Rat bastard and dishonest? Negotiation, folks. And here's the way I look at it. Someone later in the day is going to offer them a lower price, and they're going to be at the point where they realize they'd be better off getting SOMETHING for it rather than going straight to Goodwill for free. My Daddy didn't raise no fool who doesn't haggle. Seriously. My Dad would always send my sister or I up (adorable little blonde-haired girls) to the person in charge and tell us to ask if they'll take a quarter, or whatever. The poor sucker couldn't say no to an adorable little girl. That still kind of works to my advantage even now. Not that I'm irresistibly cute or anything, but I turn up the "cute" charm a notch or two and be sweet as pie to them, and they'll usually accept my offer. Not that I'm not normally a nice person. WHAT?! I AM!!  Hush, you.

Anyway, enough about my sneaky garage sale bargaining techniques. I have a present for you fellow garage sailors out there. Remember how I told you about the "hide the rest of your money" technique? I have just the thing for you. BEHOLD! THE GARAGE SAILOR POUCH!


With a super sneaky hidden zipper for bluffing your way into bargains. Not that I ever do that.
What's that? You want one? Oh, you sneaky sneaky crafter. Okay, I wrote up a tutorial for you. I hope it's clear enough, I'm brand new to the whole tutorial-writing thing, so bear with me.  If anything is super confusing, PLEASE email me any questions at damsel@me.com. Going back over all the photos I took, even *I* was confused. I wouldn't blame you if you tried to follow my instructions, went "is she NUTS?!" and gave up altogether. But really, I tried, so please let me know if anything can be clarified.

First of all, here's the pieces you'll need (click for full size pic):
Plus one more piece, because I didn't figure out the sizing until some of the assembly was already done. Just being honest. The three white pieces are fusible fleece, but next time I think I'd want to use a less thick interfacing.  It would just make things a lot easier. 
This piece will be 3 1/4 in. (3.25") x 5in. (5")
I always like to get the peripherals out of the way first, so let's go ahead and make the strap and the attachment loop for the pouch. Go ahead and cut a strip of fabric that's 12" x 2".  If you have bigger hands or wrists, you might want to make it more like 14".

Cut a piece of interfacing (I used a medium weight craft interfacing) the same length, only 1" wide. Iron/fuse it smack dab in the middle like so:
Fold in half lengthwise, and iron to make a mark in the center like so:
Now fold your outer edges in to meet the center fold like so:
Then sew along each side:
Then take your clip of choice and do this, tucking the raw edge under:
Take the other raw edge and tuck it under the fold:
Then sew it closed. I recommend making a rectangle for strength:


Cut a piece of fabric that's about 3" x 2". I didn't use interfacing for this piece, but feel free to if you like.  The length doesn't matter as much for this one.

You get the picture. I would have used a smaller D ring if I had one, but I use what I got.

Hooray! You're done with the little bits!
Onto the meat of the project. *deep breath* Okay, now I'm all nervous that I'm going to completely explain this wrong and confuse the heck out of you guys, and you won't read me anymore, and then I won't want to blog anymore and..and..and... *deep breath* Kidding. I'm in a goofy mood this morning. But really, I hope I write this out okay.

Let's start with the hidden pocket. Take the 2.5"x5" fabric and iron on the interfacing of your choice (mine is the polka dot fabric).
Do the same for the 5"x6" piece you want to be your "outside" fabric for other side of the pouch. Mine is the blue flowered big piece. 
The last piece you're going to iron interfacing onto is the 5.5"x5" piece, but you're going to leave a gap so it looks like this:
The 5" part is top to bottom, the 5.5" from left to right.
The reason I wanted a gap is to cut down on the bulk of the flap you'll be making that disguises the hidden zipper.  Next take your 2.5" piece and sew it like this:
I was really tired and cut the ends of my zipper way too soon. Don't do that.
Flip it over and flatten the zipper and topstitch it down so it will lie flat:


Now let's do the other half of the front. Take the non-interfaced side of the 5.5"x5" piece and sew it wrong-side-up onto the right-side-up zipper (make sense? Have I lost you yet?):

Now comes the fun part. Fold the wrong sides together so the 5" sides meet, bringing the non-fused fabric over the fused part like this:
Give the folded edge a bit of an iron to mark the crease. You won't be sewing it yet though! We're going to add our ribbon, which is crucial to the whole "hiding the zipper" thing. The ribbon makes it look like it's just a decorative fun way to split up your fabrics. Sneaky, eh? Heh heh heh. I dove into my vintage ribbon collection my parents found.....guess where? GARAGE SALES! Pin in place, bringing it riiiiiight up to the folded edge, maybe even a smidge over. The ric rac on this ribbon worked perfectly for really disguising the edge!

Flipped over, this is what it should look like
Go ahead and sew it down. That also anchors the fold to help it lie flat. If your ribbon is wider than the "flap" and goes all the way over the zipper, you'll have to open up the zipper so you won't sew the whole thing shut. Knowwhaddimean?

It would have been better if the ribbon was wider to come up closer to the zipper, but that's okay. I'm totally happy.
Yay! Next we're going to attach the inside lining of the hidden pocket:
When you flip the piece you just sewed over, the edges should meet up:
Now you can topstitch to keep the zipper flat and hold the two pieces together, making sure you lift up the "flap":
Sew along the edges to hold the front and back together to keep it all even, so the underneath of the bigger half should look like this:
Like it's all one front and back piece
Sew along the edge to hold the "flap" down in place.
See? Sneaky hidden zipper underneath!
Guess what? THE HARD PART IS OVER!!! Whew. Was that too confusing? Did I do okay? I'm so nervous about my first sewing tutorial. The only thing left to do for your entire outside half of the pouch is lay it wrong side down on top of the right-side-up 5"x6" piece like so (don't mind the marks on the fabric-we'll get to that in a sec):
stitch all along the outside edges to make it all one piece.
Okay, make the corner marks 1"x1" with a fabric marker or chalk or whatever you have. Then sew along those marks because we'll be cutting them like so:

Obviously, do the rest of your pieces too! See? You can totally understand how this is going to come together, right?  Don't pay attention to what's going on on the right, I did some things out of sequence. I'm just writing it out so it's easier for you guys. This was highly experimental for me. Bring the sides of the notches together, and sew. Do this for all of the pieces.


Alright, let's take care of the main zipper. Cut two pieces of fabric that are 2"x2" and do this to them:


Cut your zipper to exactly 5"


Okey dokey, smooth sailing from here!

Pay absolutely no attention to the fact that the corners aren't pooched at this point. Like I said, I did some things out of order and re-arranged it for the tutorial. The corners should be pooched. Attach the thingeemabobber:

Sew the lining on the zipper like so:


Topstitch by the zipper to keep it nice and neat:
Now all that's left is to sew all around the edges! The zipper ends shouldn't be reaching the outer edge. That's how you get nice neat corners at the zipper. 

Sewing where the white marks are where it says "leave open" is a really cool trick for making it easy to tuck your ends in when you finally sew the lining shut. 
There you go! Turn it inside out!
Close up the opening

And you're done!


Well? How did I do? Clear as mud? Most awkward tutorial ever? It's okay. You can tell me. I can take it. 

Now for the best part. Do you like this one? You can win it! Just leave a comment below and I'll randomly draw a number! You have until June 22nd to enter!
So go forth and sail thee some garages! As my Dad says "Bargains await! Ya never know!"